

Data persistence with React Native and Amplify DataStore


In this post, we're going to take a React Native Todo app for Android and address a few of the common issues faced by developers. We will start by looking into offline first app development, which is an approach that in case users' mobile device loses connectivity how can we handle allowing the app to continue to function by persisting data on the device itself and for that we will take look into adding Amplify DataStore client library to handle that for us. We will first demonstrate this without using any external environment in the cloud. Next, we will gradually add integration with AWS using Amplify to add authentication and authorization to our app. Lastly, we will establish cloud backend resources and use AWS Amplify DataStore to help orchestrate data synchronization between the time our device lost connectivity and the time it regained connection and update our AWS backend storage for our Todo app.
What you will learn here
Handling offline data storage on-device via Amplify DataStore by adding aws-amplify library dependency to your app.
Adding authentication with Amplify Auth.
Use of Amplify DataStore to orchestrate data synchronization between a mobile app and Amplify's backend services.
Prerequisites
Before starting this tutorial, you will need the following:
An AWS Account (if you don't yet have one, please create one and set up your environment).
Nodejs version 14.x or latest installed.
AWS Amplify CLI installed and configured to connect to your AWS account - see getting started.
Have your local environment setup for React Native development using Expo CLI.
TODOs App
We're working off of a very simple React Native app that for now simply takes some tasks and displays them. You can also delete the todo items and it removes them from the UI. However, what this app can not do at this time is to store these updates anywhere. If you add an item or delete an item, kill the app and re-start it none of your changes are persisted anywhere.

However, there are a few problems. One is if the app is closed and or re-loaded we lose our todo items, see screenshots below. Also, our app lacks authentication, and in addition at some point we would ideally want to synchronize its data back and forth to a backend datastore.
| Reloading | After Reload |
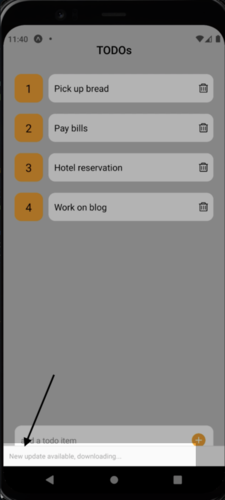 |  |
First, a high level overview of the code base for the app before evolving its features. There are two main components, TodoInput.js and TodoItem.js that are then are referenced in our App.js to bring everything together.
Let's start with TodoInput.js
import React, { useState } from 'react';
import { KeyboardAvoidingView, StyleSheet, View, TextInput, TouchableOpacity, } from "react-native";
import { AntDesign } from '@expo/vector-icons';

export default TodoInput = (props) => {
    const [task, setTask] = useState();

    const handleAddTask = (value) => {
        props.addTask(value);
        setTask(null);
    }

    return (
        <KeyboardAvoidingView
            behavior={Platform.OS === "ios" ? "padding" : "height"}
            style={styles.container}
        >
            <TextInput style={styles.inputField} value={task} onChangeText={text => setTask(text)} placeholder={'add a todo item'} placeholderTextColor={'#888'} />
            <TouchableOpacity onPress={() => handleAddTask(task)}>
                <View style={styles.button}>
                    <AntDesign name="pluscircle" size={24} color="orange" />
                </View>
            </TouchableOpacity>
        </KeyboardAvoidingView>
    );
}

const styles = StyleSheet.create({
    container: {
        borderColor: '#fff',
        backgroundColor: '#fff',
        borderWidth: 1,
        marginHorizontal: 20,
        borderRadius: 12,
        flexDirection: 'row',
        alignItems: 'center',
        justifyContent: 'space-between',
        paddingHorizontal: 10,
        position: 'absolute',
        bottom: 20,
    },
    inputField: {
        color: '#000',
        height: 50,
        flex: 1,
    },
    button: {
        height: 30,
        width: 30,
        borderRadius: 5,
        backgroundColor: '#fff',
        alignItems: 'center',
        justifyContent: 'center'
    },
});
The above component renders an input field in which we can simply provide a todo task. The second component, TodoItem.js is responsible to display a list of one or more todo items
import React from 'react';
import { StyleSheet, Text, View, TouchableOpacity, } from "react-native";
import { AntDesign } from '@expo/vector-icons';

export default TodoItem = (props) => {
    return (
        <View style={styles.container}>
            <View style={styles.indexContainer}>
                <Text style={styles.index}>{props.index}</Text>
            </View>
            <View style={styles.todoContainer}>
                <Text style={styles.task}>{props.task}</Text>
                <TouchableOpacity onPress={() => props.deleteTask()}>
                    <AntDesign style={styles.delete} name="delete" size={18} color='#000' />
                </TouchableOpacity>
            </View>
        </View>
    );
}


const styles = StyleSheet.create({
    container: {
        flexDirection: 'row',
        marginHorizontal: 20,
    },
    indexContainer: {
        alignItems: 'center',
        justifyContent: 'center',
        width: 50,
        height: 50,
        backgroundColor: '#ffa500',
        borderRadius: 12,
        marginRight: 10,
    },
    index: {
        color: '#000',
        fontSize: 20,
    },
    todoContainer: {
        alignItems: 'center',
        flex: 1,
        paddingHorizontal: 10,
        paddingVertical: 5,
        minHeight: 50,
        backgroundColor: '#fff',
        borderRadius: 12,
        flexDirection: 'row',
        justifyContent: 'space-between'
    },
    task: {
        color: '#000',
        width: '90%',
        fontSize: 16,
    },
    delete: {
        marginLeft: 10
    },
});
Now to bring everything together as one here is App.js
import React, { useEffect, useState } from 'react';
import { Keyboard, ScrollView, StyleSheet, Text, View } from 'react-native';
import TodoInput from './components/TodoInput';
import TodoItem from './components/TodoItem';

export default function App() {
  const [tasks, setTasks] = useState([]);

  const addTask = async (task) => {
    if (task == null) return;
    Keyboard.dismiss();
  }

  const deleteTask = (task, deleteIndex) => {
    setTasks(tasks.filter((value, index) => index != deleteIndex));
  }

  return (
    <View style={styles.container}>
      <Text style={styles.heading}>TODOs</Text>
      <ScrollView style={styles.scrollView}>
        {
          tasks.map((task, index) => {
            return (
              <View key={index} style={styles.taskContainer}>
                <TodoItem index={index + 1} task={task.task} deleteTask={() => deleteTask(task, index)} />
              </View>
            );
          })
        }
      </ScrollView>
      <TodoInput addTask={addTask} />
    </View>
  );
}

const styles = StyleSheet.create({
  container: {
    backgroundColor: '#c0c0c0',
    flex: 1
  },
  heading: {
    color: '#000',
    fontSize: 20,
    fontWeight: '600',
    marginTop: 30,
    marginBottom: 10,
    textAlign: 'center',
  },
  scrollView: {
    marginBottom: 70,
  },
  taskContainer: {
    marginTop: 20,
  }
});
Amplify DataStore persisting data on device
One of the things that Amplify DataStore does is it helps with abstracting the underlying APIs you need to use to persist data into your device's local storage and we will see an example of that shortly below. Moreover, it works behind the scenes to synchronize your data to and from your cloud backend to your device's local storage. You as a developer use the DataStore API for your reading and writing to the device local storage, which in turn interacts with another DataStore components called Store Engine. This Store Engine handles the queries between your device's local storage and your app. Optionally you can configure it to work with another DataStore components called Sync Engine to sync the changes to your local data to a cloud backend in addition to sync your cloud data back to your device's local storage, for example if you were offline and there were external updates to your cloud backend. It's worth mentioning that the Sync Engine uses a managed GraphQL offering called AppSync to send your data models as GraphQL queries to your backend.
In order to add Amplify DataStore functionality to our project without fully integrating with AWS cloud services we're going to first run:
npx amplify-app@latest
As a result of running npx amplify-app a new script entry was added our project's package.json:
"amplify-modelgen": "node amplify/scripts/amplify-modelgen.js",
Why do we care? To re-iterate, at this point we're going to persist our todo items in our device's local storage. So, we need to have some sort of schema to model our data around. Amplify DataStore is built on top of AWS AppSync and uses GraphQL schema definition language as an abstraction for how it communicates with various AWS services by using AWS Appsync as its API layer. In our case we're not using AppSync, not just yet. We just need to let DataStore's client library handle all the CRUD operations for us and that requires that our data is modeled as GraphQL schema. DataStore will handle all the communication protocols with the underlying local storage for us.
Before running the script let's head to amplify/backend/api/amplifyDatasource/schema.graphql. This directory and its content were just generated for us when we execute npx amplify-app. We're going to modify its content with our schema of todo item:
type Task @model {
  id: ID!
  task: String!
}
This is not the most elaborate schema but simple enough to get the point across. However, few things to point out here. @model in Amplify terms is using a transform library that creates a schema and CRUD operations on a DynamoDB table behind the scenes from our Todo base type up there. Great thing about all this is that we get it by just running the script that's going to be pulled down for us when we executed
npx amplify-app@latest
We got our schema setup so now let's generate the resources that tell Amplify what model we need to generate:
npm run amplify-modelgen
The end result of executing the script is that Amplify will generate the model for us under src/models/. In our code we will import from there to get a reference to our model in order to use for database operations. Take a peek under that directory and you will see number of javascript and typescript files containing the our model and other logic that DataStore requires to handle communication with local storage.
Let's add dependencies for Amplify client libraries in addition to what React Native itself requires for local storage. Amplify DataStore library will use them under the hood to make it seamless for developers to handle database transactions:
npm install aws-amplify @react-native-community/netinfo @react-native-async-storage/async-storage
Let's look at code changes required by thinking about where are the integration points. For us they are when we create a todo item and when we delete one.
Starting with adding/creating items which is handled in TodoInput.js:
import { DataStore } from "aws-amplify";
import { Todo } from "../src/models";

export default TodoInput = (props) => {
    const [task, setTask] = useState();

    const handleAddTask = async (value) => {
        const newTodo = await DataStore.save(
            new Todo({
                task: value,
                id: Math.random().toString(36).substring(7)
            })
        )
        props.addTask(value);
        setTask(null);
    }
In this component's handleAddTask function expression we refactored it to instantiate a new Todo object, call the save method from Amplify's DataStore API DataStore.save(), then assigning a value passed from UI for Todo's value and finally an arbitrary id, that's it. Take note that we modified the function to use aync-await given we're going a database which is an asynchronous operation. Moving to App.js and main modifications:
useEffect(() => {
    fetchTasks();
  }, []);

  async function fetchTasks() {
    let DataStoreItems = await DataStore.query(Task);
    setTasks(DataStoreItems.map((item) => item));
  }

  async function deleteTaskFromStorage(deleteItem) {
    const todoDelete = await DataStore.query(Task, deleteItem);
    DataStore.delete(todoDelete);
  }
We added two new functions, fetachTasks() as the name implies fetches data from local storage on the device and sets the state when the app is loaded. The second is to handle deletion, and the approach used is to query the item to be deleted first and then proceed with delete. Why? Models in DataStore are immutable. To update or delete a record you must use a copy and then apply update or delete to the item's fields rather than mutating the instance directly. Below, can see this component in its entirety:
import React, { useEffect, useState } from 'react';
import { Keyboard, ScrollView, StyleSheet, Text, View } from 'react-native';
import TodoInput from './components/TodoInput';
import TodoItem from './components/TodoItem';
import { DataStore } from "aws-amplify";
import { Task } from "./src/models";

export default function App() {
  const [tasks, setTasks] = useState([]);

  useEffect(() => {
    fetchTasks();
  }, []);

  async function fetchTasks() {
    let DataStoreItems = await DataStore.query(Task);
    setTasks(DataStoreItems.map((item) => item));
    console.log('fetchTasks', DataStoreItems)
  }

  async function deleteTaskFromStorage(deleteItem) {
    const todoDelete = await DataStore.query(Task, deleteItem);
    DataStore.delete(todoDelete);
  }

  const addTask = async (task) => {
    console.log('addTask', task);
    if (task == null) return;
    fetchTasks();
    Keyboard.dismiss();
  }

  const deleteTask = (task, deleteIndex) => {
    deleteTaskFromStorage(task);
    setTasks(tasks.filter((value, index) => index != deleteIndex));
  }

  return (
    <View style={styles.container}>
      <Text style={styles.heading}>TODOs</Text>
      <ScrollView style={styles.scrollView}>
        {
          tasks.map((todo, index) => {
            return (
              <View key={index} style={styles.taskContainer}>
                <TodoItem index={index + 1} task={todo.task} deleteTask={() => deleteTask(todo, index)} />
              </View>
            );
          })
        }
      </ScrollView>
      <TodoInput addTask={addTask} />
    </View>
  );
}

const styles = StyleSheet.create({
  container: {
    backgroundColor: '#c0c0c0',
    flex: 1
  },
  heading: {
    color: '#000',
    fontSize: 20,
    fontWeight: '600',
    marginTop: 30,
    marginBottom: 10,
    textAlign: 'center',
  },
  scrollView: {
    marginBottom: 70,
  },
  taskContainer: {
    marginTop: 20,
  }
});
these are screenshots of when we have Amplify DataStore applied to enable local storage. As you can see the data has been persisted to the device's local storage, therefore the UI still has access to data even after a re-load:
| Re-loading with DataStore | After re-loading |
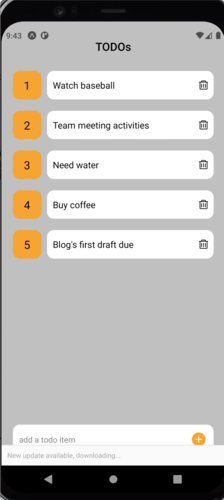 |  |
Below we are demonstrating a delete action. We deleted what used to be item 4 Buy Coffee and likewise, when deleting an item we used Amplify DataStore to handle the local storage delete for us. Screenshots below depict this behavior:
| App re-loading | App after re-loading |
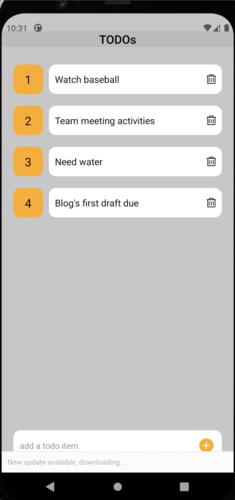 |  |
Using Amplify to add authentication
Before adding authentication to our app there are few housekeeping items we are required to perform to get our Amplify project going. Using Amplify CLI first thing we need to do is initialize our project by running the following command from the root of our project:
amplify init initializes a new project, sets up deployment resources in the cloud and makes your project ready for Amplify.
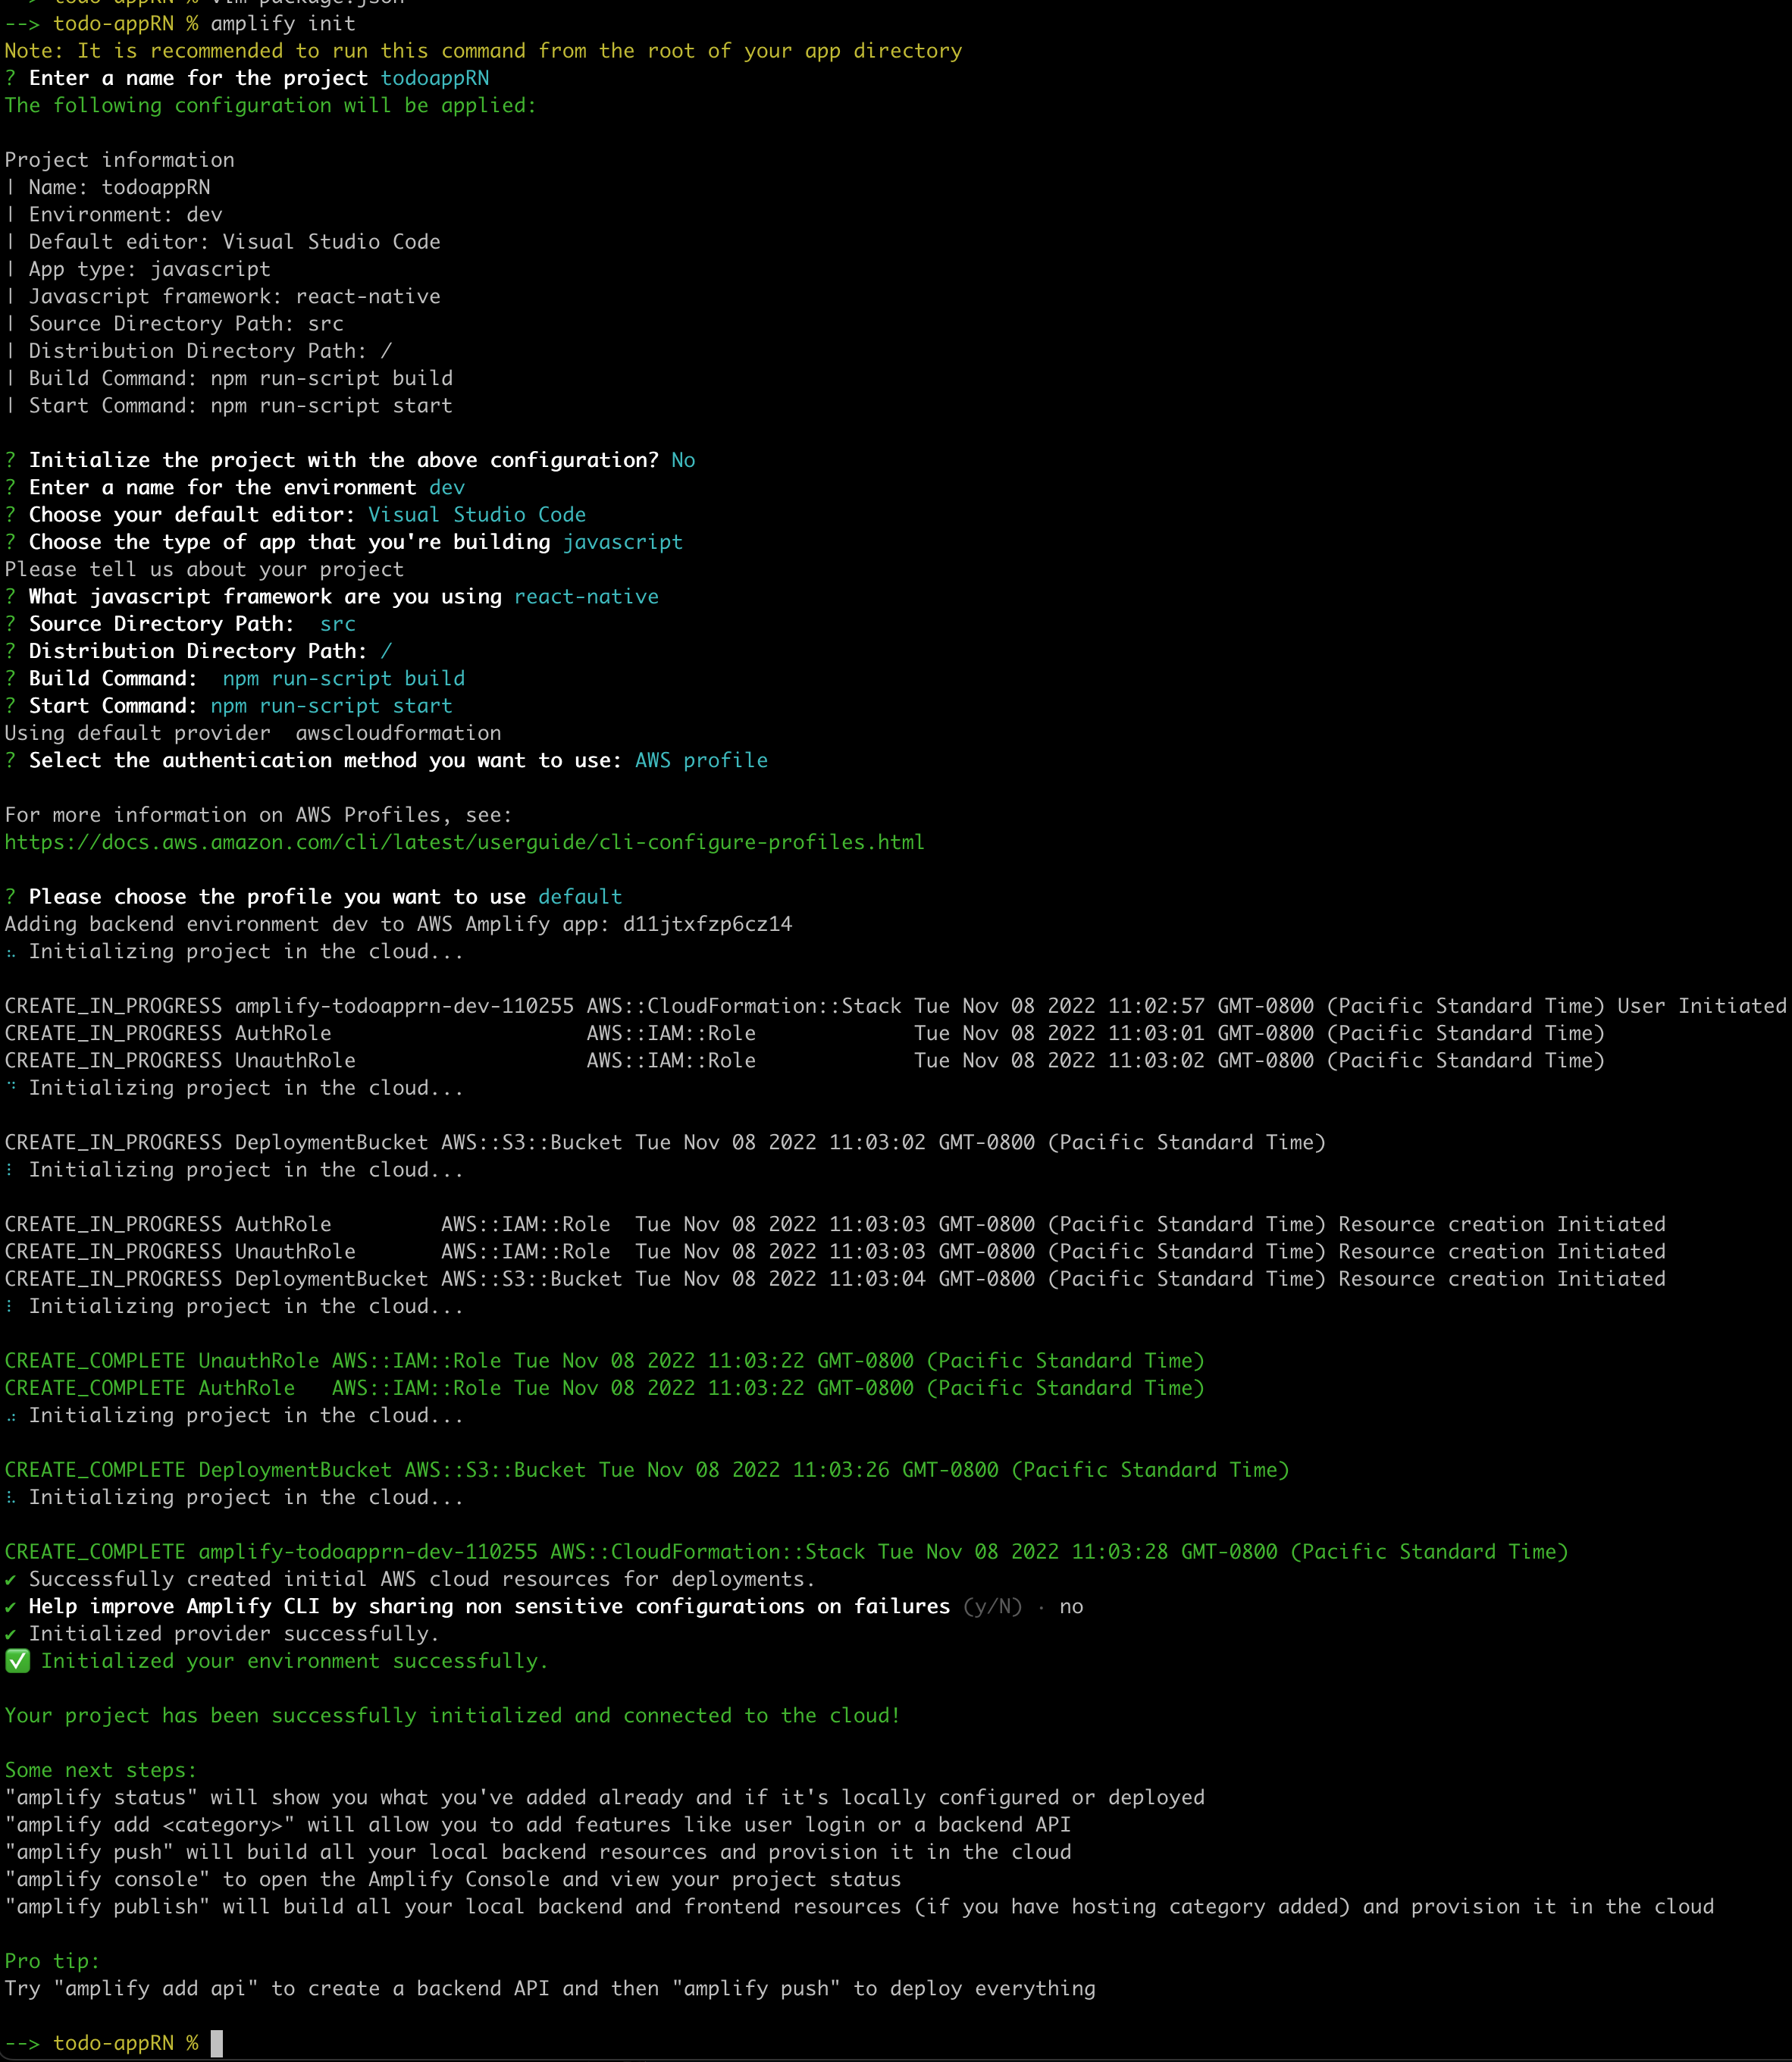
resources created running amplify init are used by Amplify itself these are not part of your application.
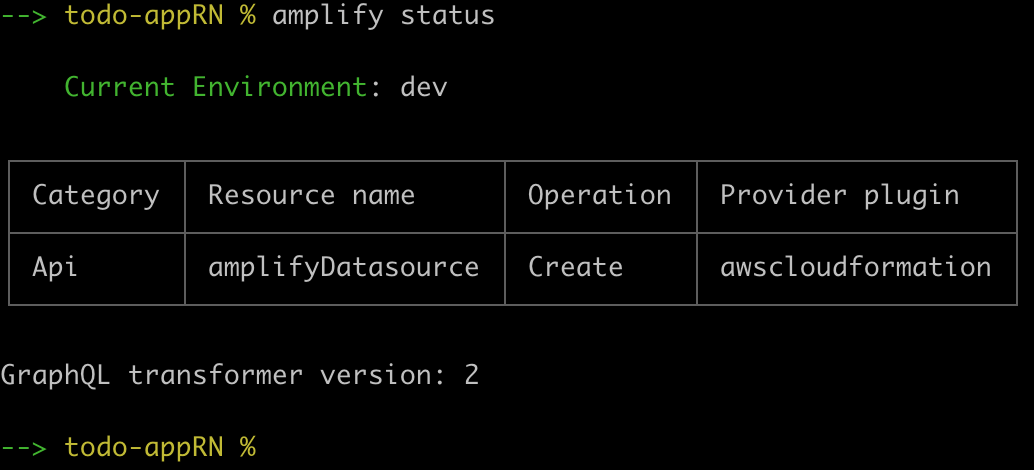
Now that we have initialized our app the result of amplify-status shows the state of local resources not yet pushed to the cloud (Create/Update/Delete). In our case amplifyDatasource API.
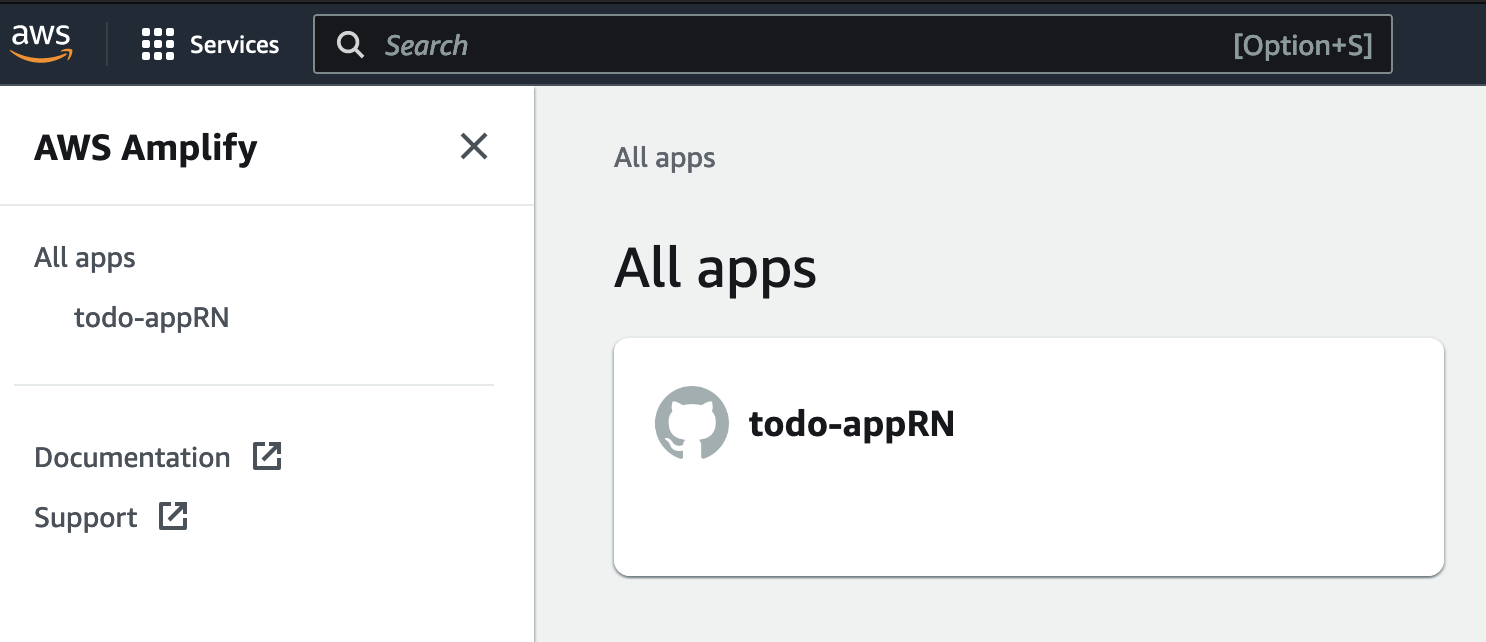
and a look at our AWS Amplify console we see that our app was deployed
Authentication and authorization are two primary means of securing applications. Using authentication we can verify you are who you say you are or ensure the identity of the user or a system trying to access our application. Authorization on the other hand determines what you can do inside the application or your access rights after your identity has been established or has been authenticated.
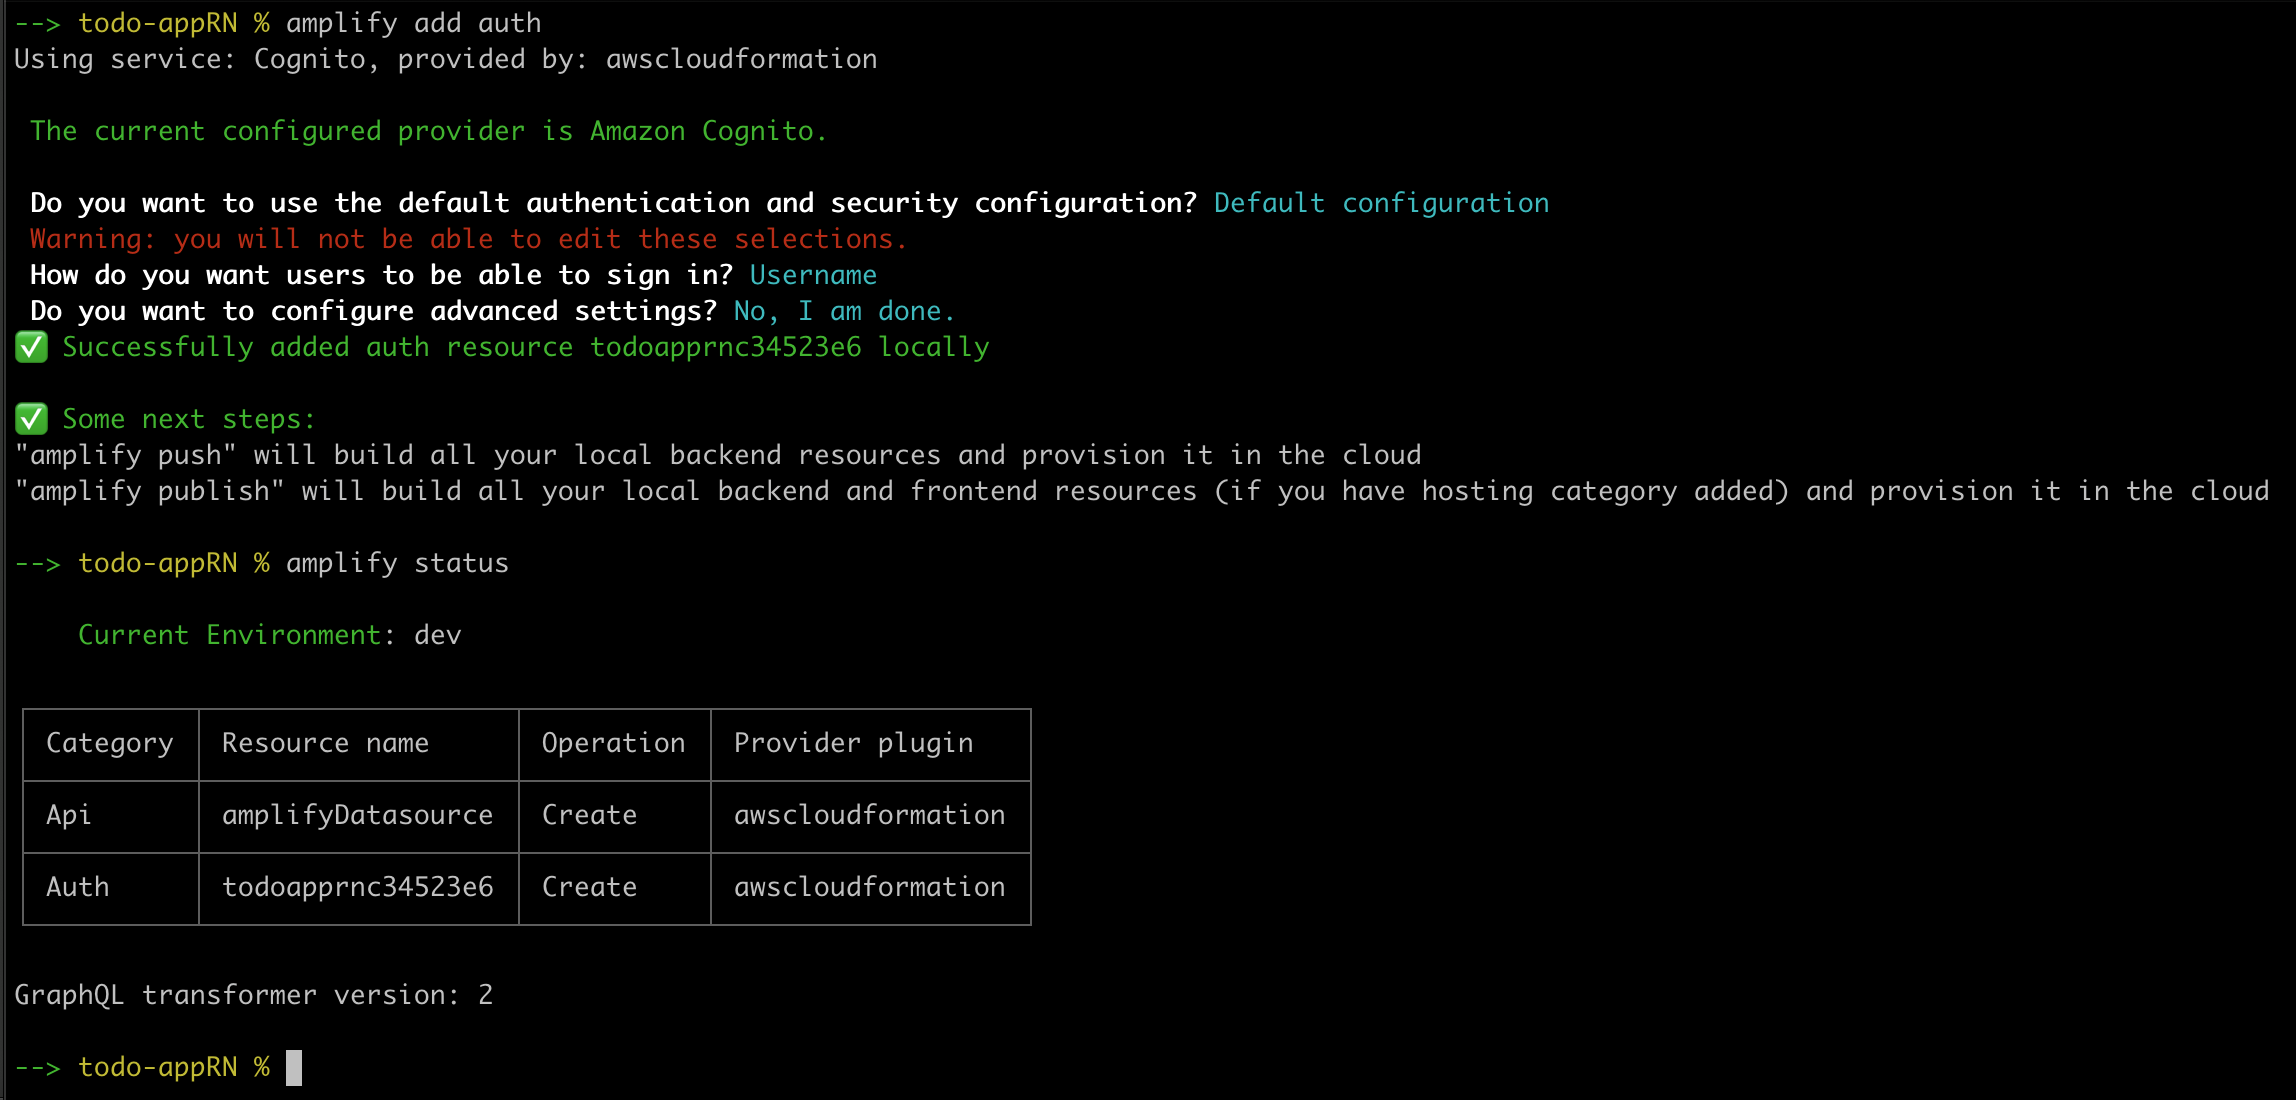
Currently, the Authorization mode for the DataStore in the app is set to API key but we want to use AWS Cognito instead. We can execute amplify add auth to first add authentication using AWS Cognito followed by amplify status to see where we stand
It's time to add the necessary dependency to App.js so Amplify can handle user registration and authentication for us on the UI.
npm install aws-amplify-react-native
App.js after adding a dependency for authentication, note that the styles section was not added here for brevity.
import React, { useEffect, useState } from 'react';
import { Keyboard, ScrollView, StyleSheet, Text, View, Pressable } from 'react-native';
import TodoInput from './components/TodoInput';
import TodoItem from './components/TodoItem';
import { DataStore } from "aws-amplify";
import { Task } from "./src/models";
import { Amplify } from 'aws-amplify';
import awsconfig from './src/aws-exports';
import { withAuthenticator } from 'aws-amplify-react-native';
import { Auth } from 'aws-amplify';

Amplify.configure(awsconfig);

function App() {
  const [tasks, setTasks] = useState([]);

  useEffect(() => {
    fetchTasks();
  }, []);

  async function fetchTasks() {
    let dataStoreItems = await DataStore.query(Task);
    setTasks(dataStoreItems.map((item) => item));
    console.dir(dataStoreItems);
  }

  async function deleteTaskFromStorage(deleteItem) {
    const todoDelete = await DataStore.query(Task, deleteItem);
    DataStore.delete(todoDelete);
  }

  const addTask = async (task) => {
    console.log('addTask', task);
    if (task == null) return;
    fetchTasks();
    Keyboard.dismiss();
  }

  const deleteTask = (task, deleteIndex) => {
    deleteTaskFromStorage(task);
    setTasks(tasks.filter((value, index) => index != deleteIndex));
  }

  async function signOut() {
    try {
      await Auth.signOut();
    } catch (error) {
      console.log('error signing out: ', error);
    }
  }

  return (
    <View style={styles.container}>
      <Text style={styles.heading}>TODOs</Text>
      <ScrollView style={styles.scrollView}>
        <Pressable style={styles.button} onPress={signOut}>
          <Text style={styles.text}>Sing Out</Text>
        </Pressable>
        {
          tasks.map((todo, index) => {
            return (
              <View key={index} style={styles.taskContainer}>
                <TodoItem index={index + 1} task={todo.task} deleteTask={() => deleteTask(todo, index)} />
              </View>
            );
          })
        }
      </ScrollView>
      <TodoInput addTask={addTask} />
    </View>
  );
}
export default withAuthenticator(App);
...
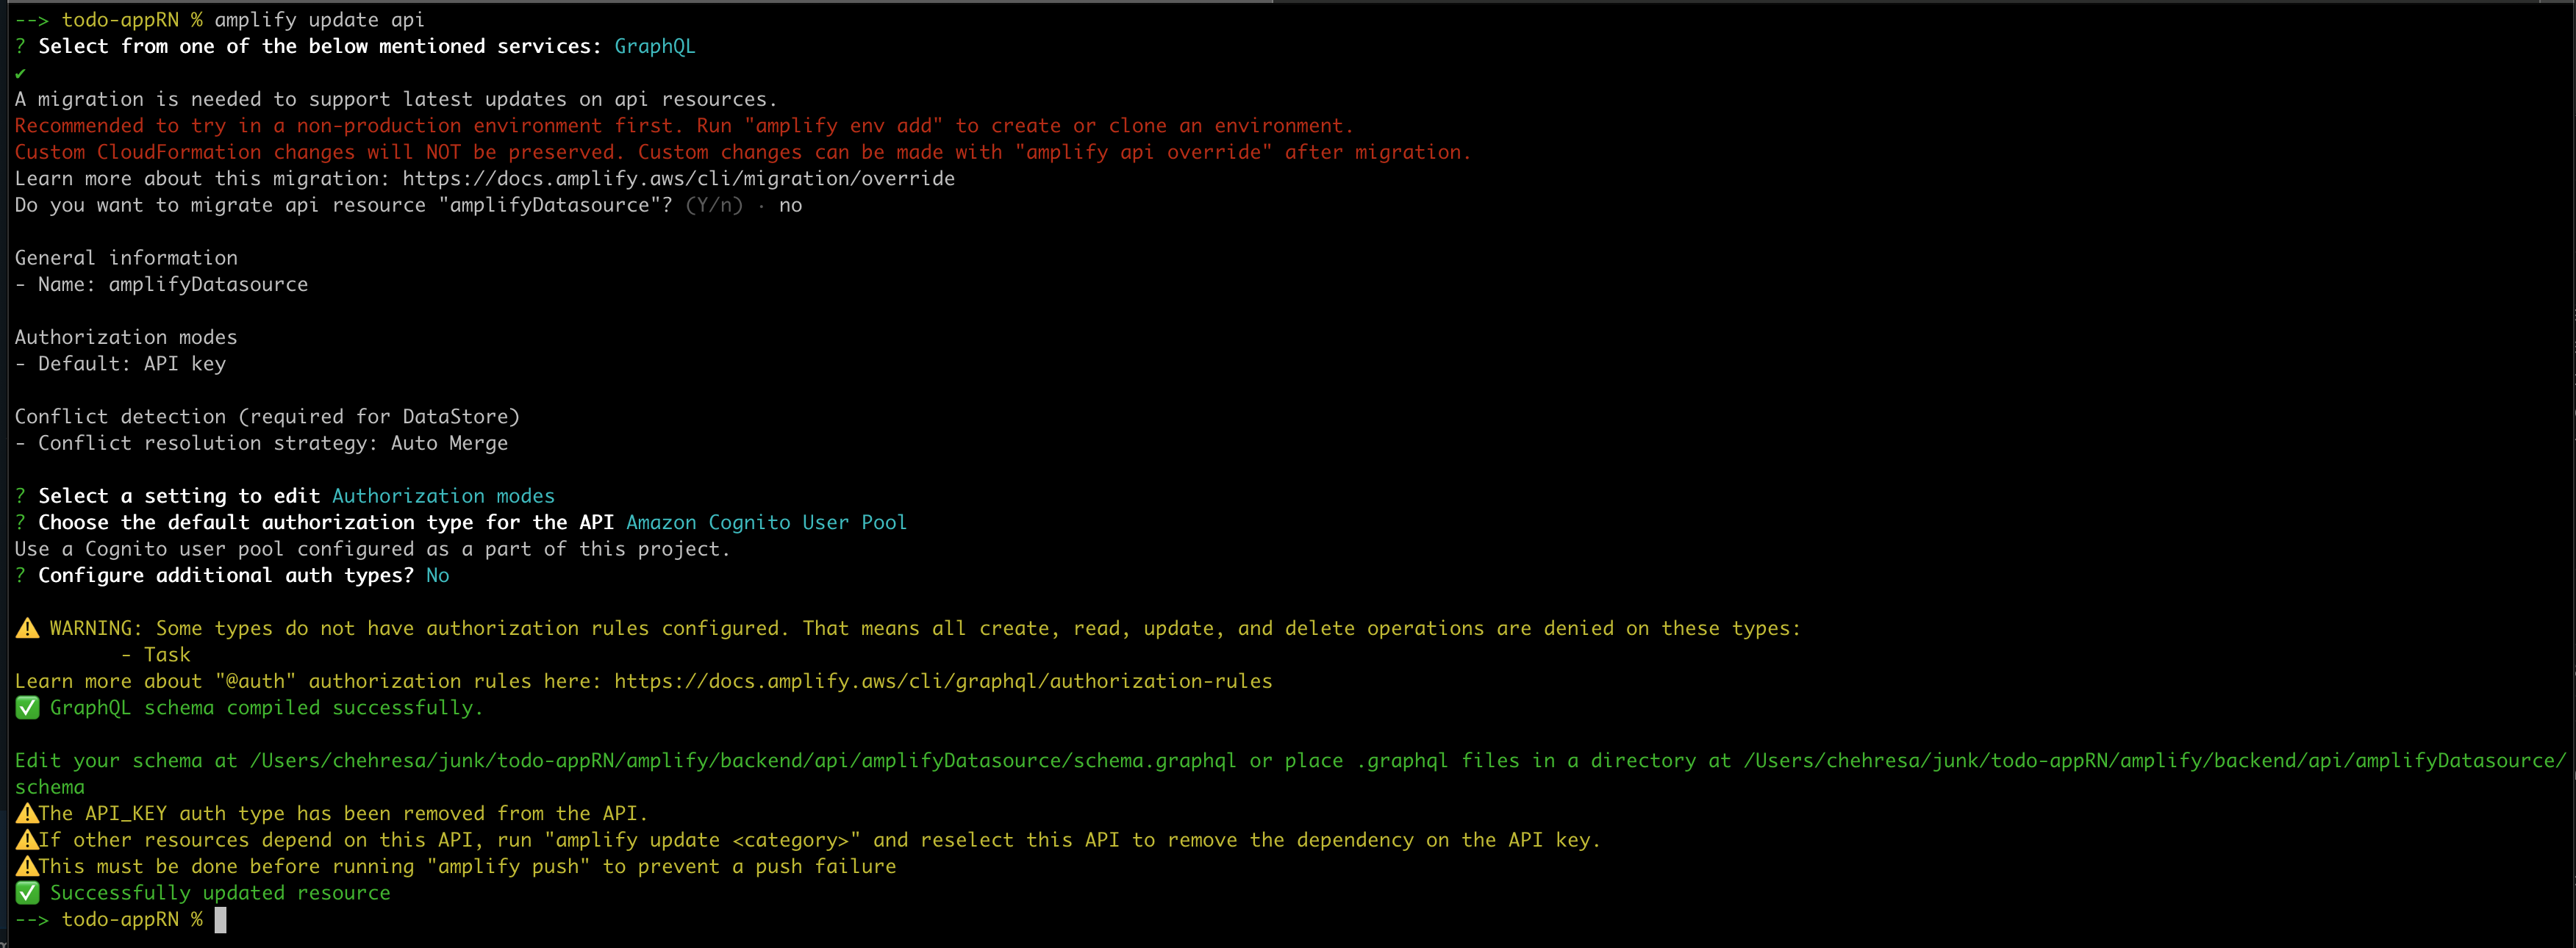
Now, we can update our datastore to use AWS Cognito using amplify update api
We can now push our changes to the cloud. Run amplify push and monitor its progress as it will take a few minutes to complete and should see something similar to the screenshot below:

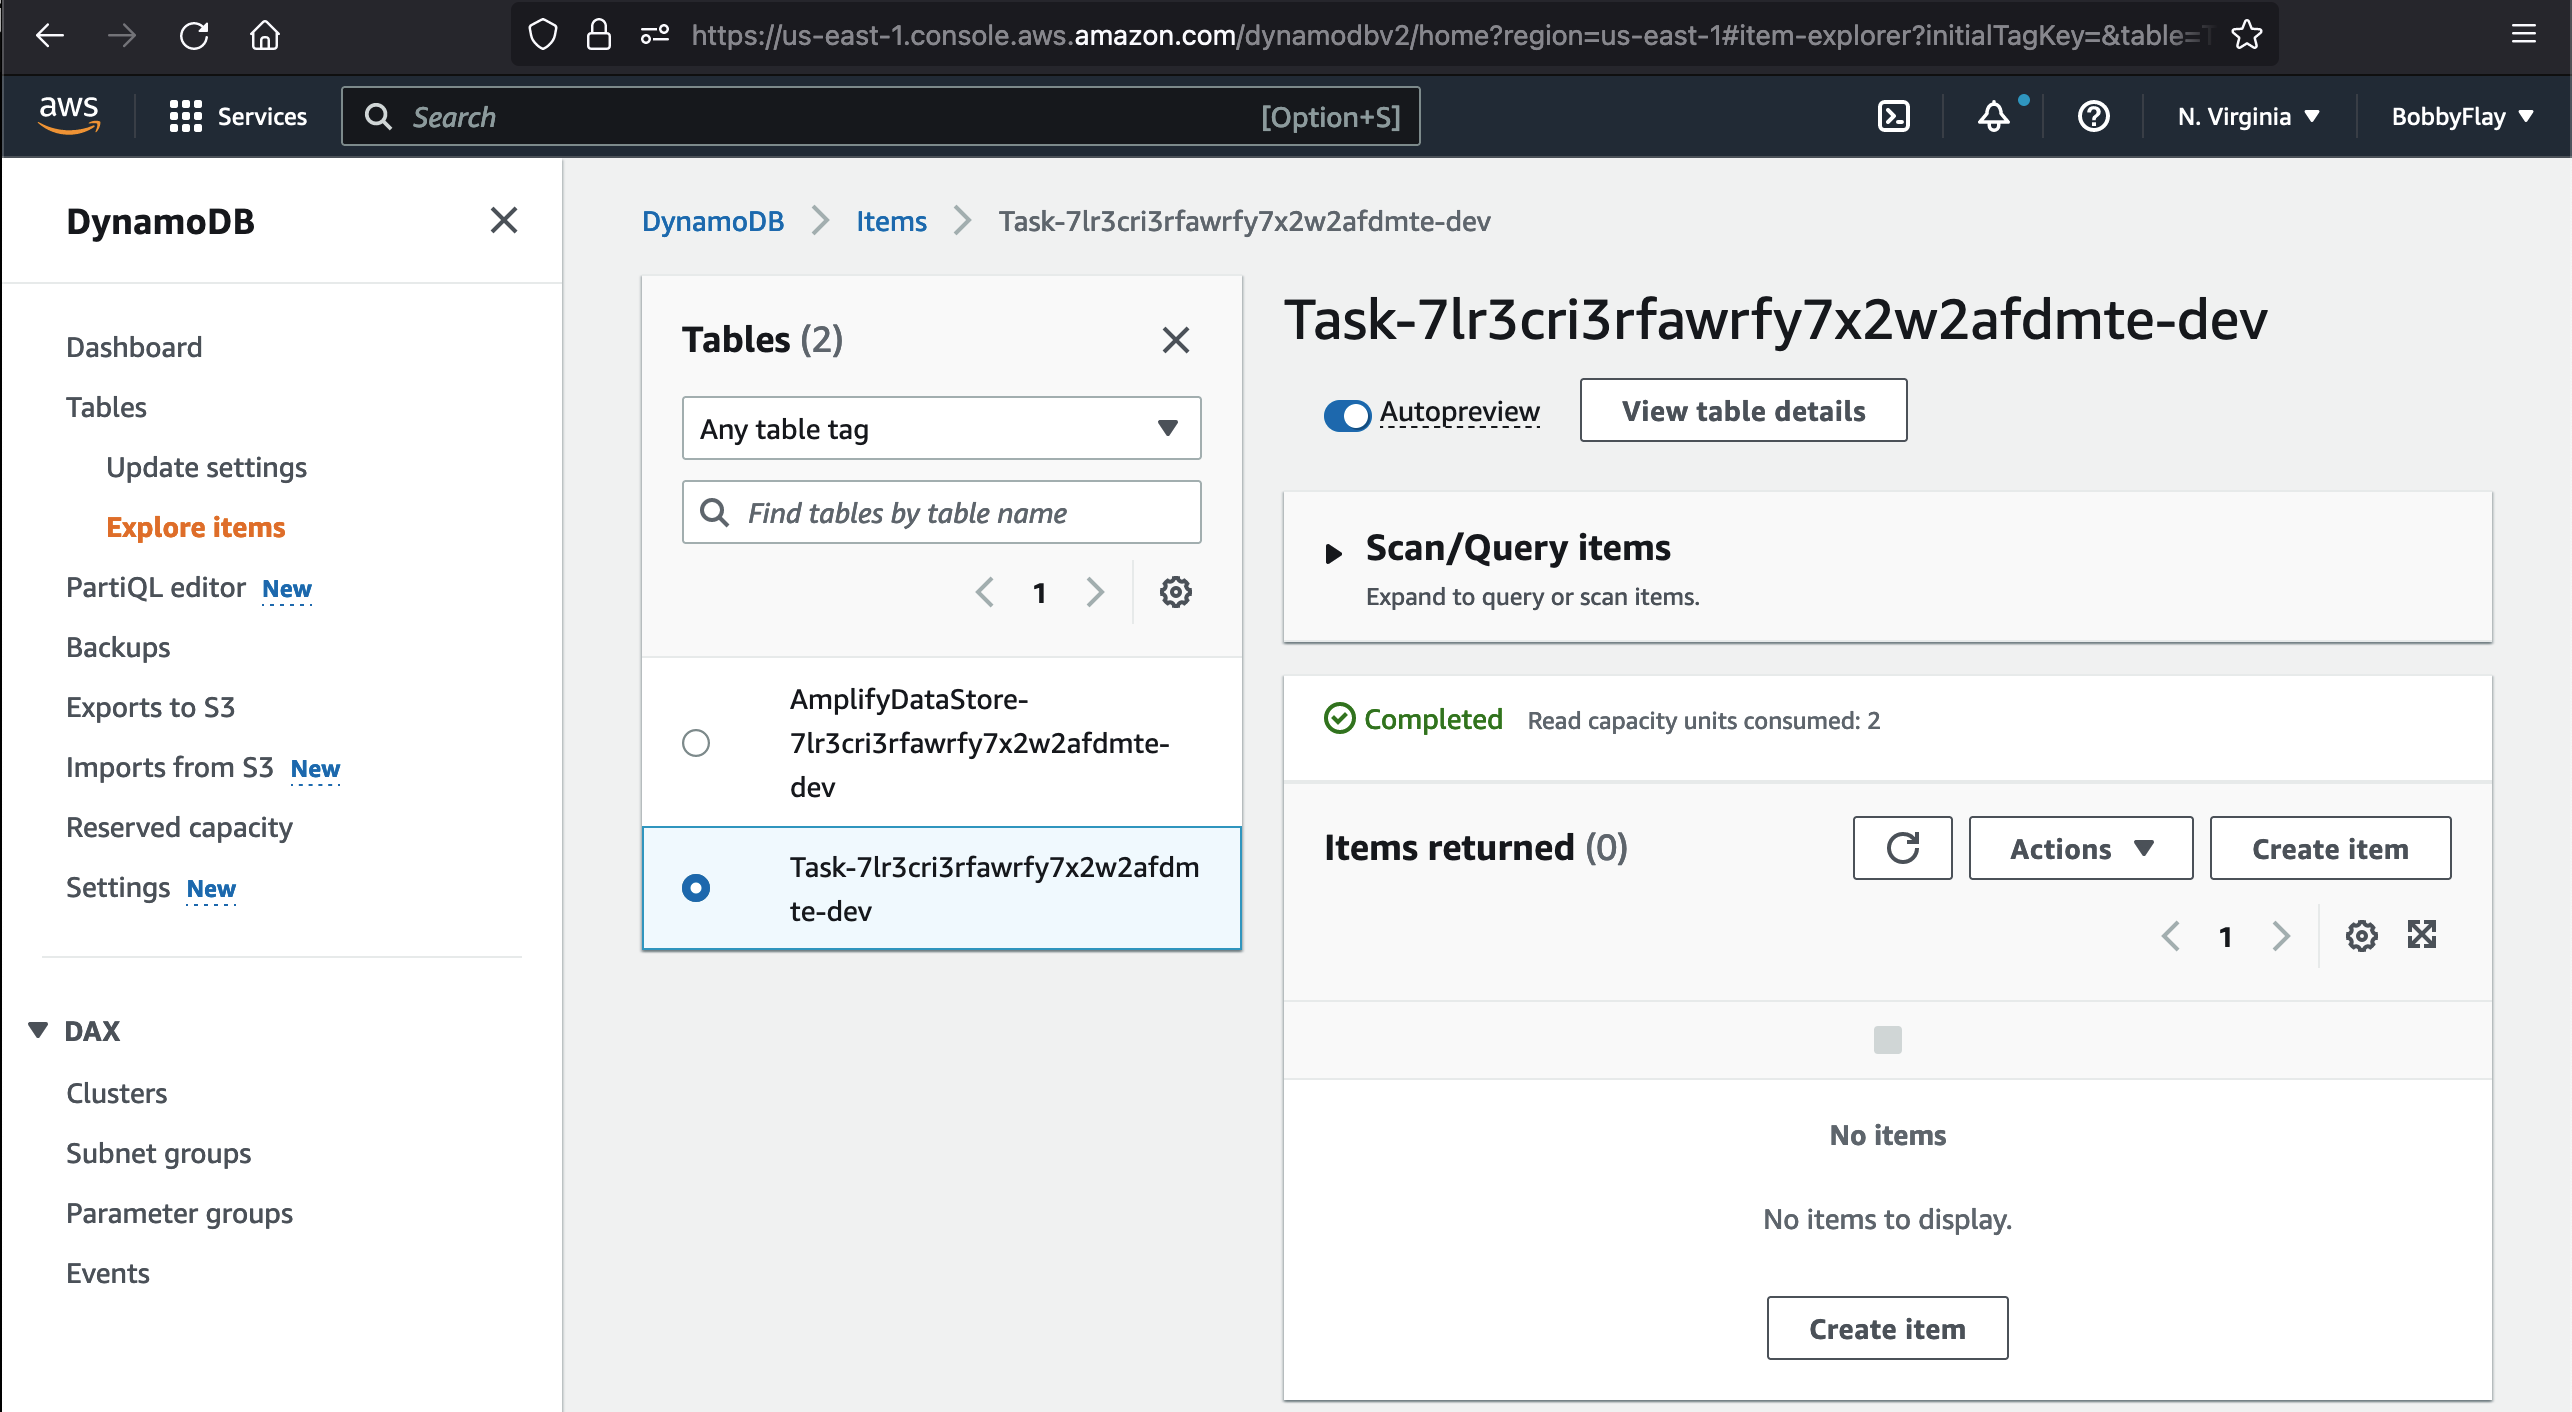
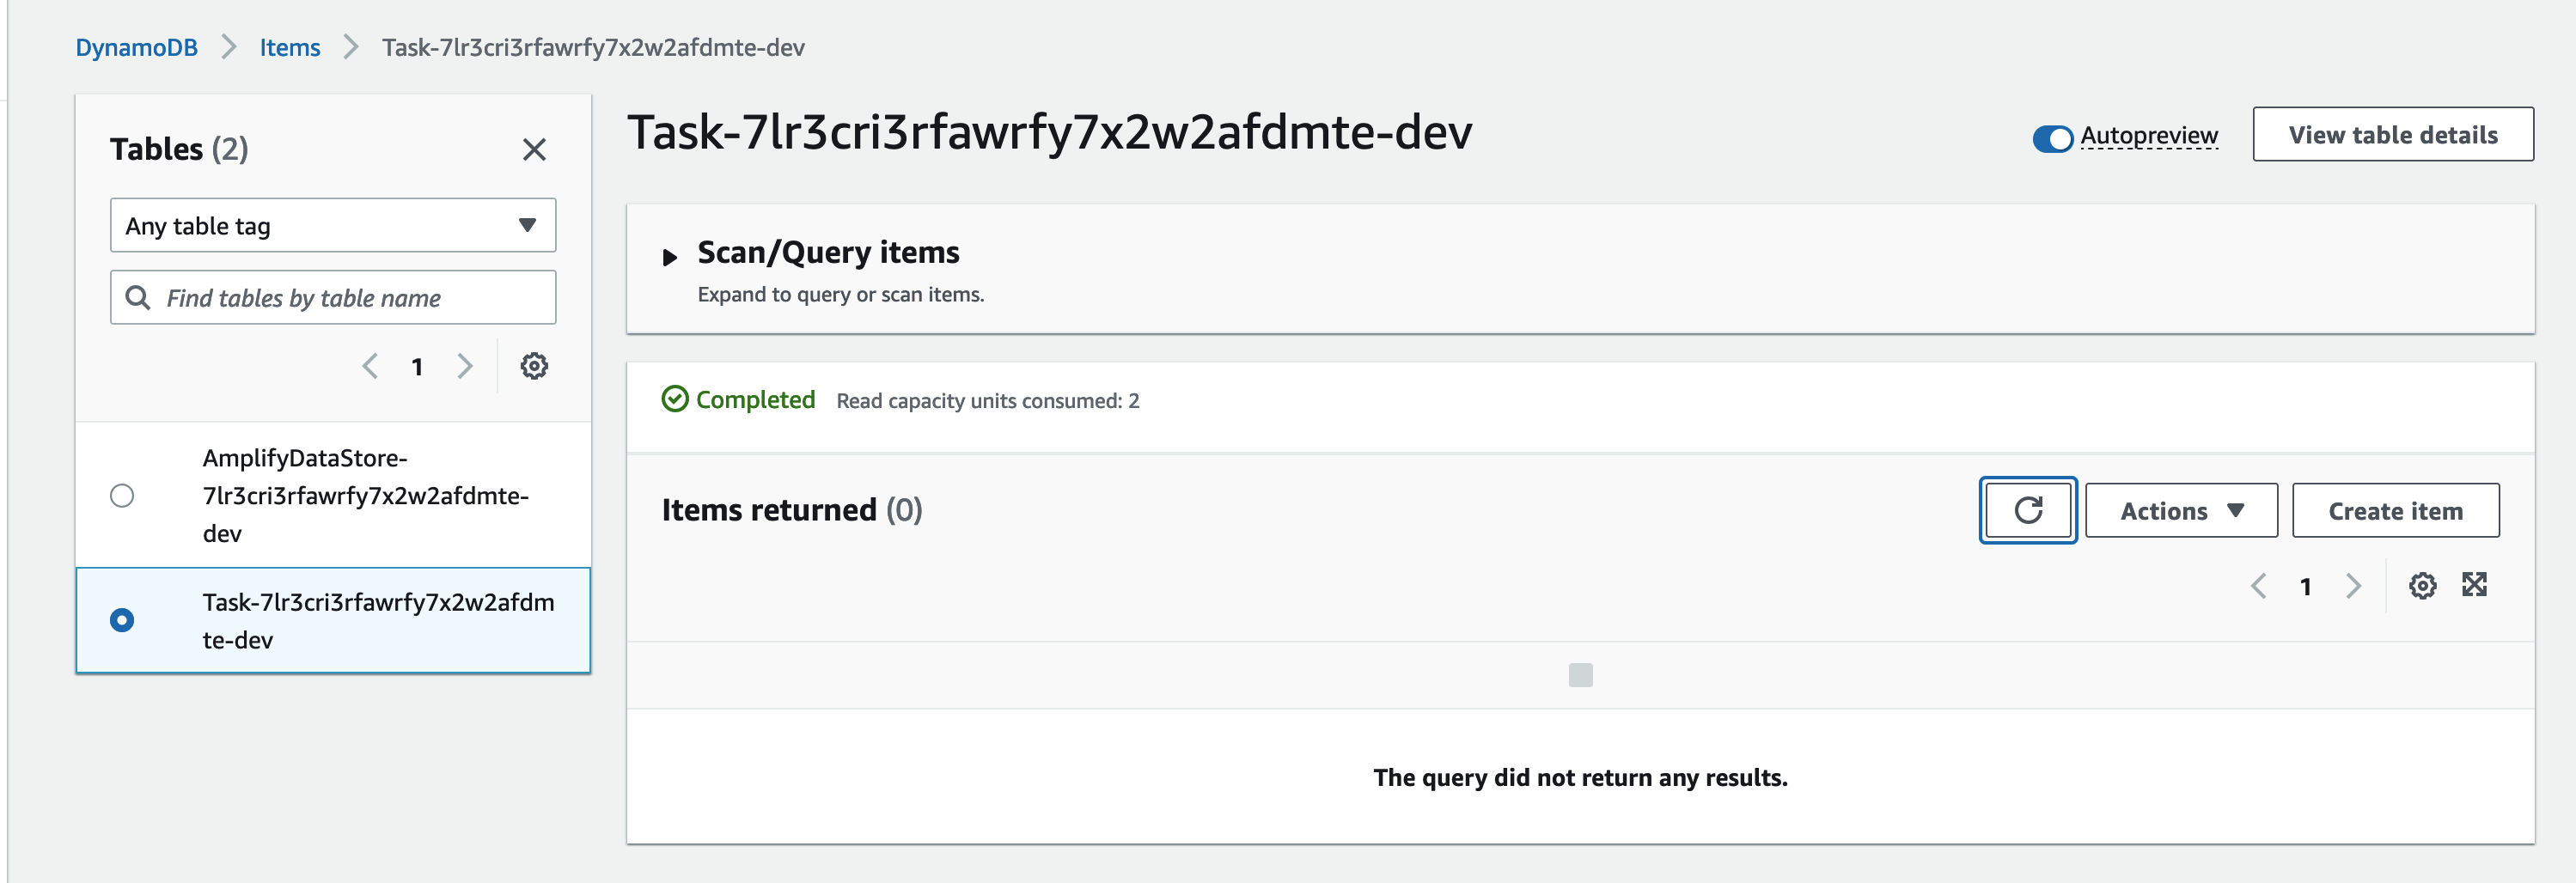
At this point, it's a good idea to take a peek at our AWS backend that was set up for us by Amplify CLI specifically DynamoDB which DataStore uses to store our data.
Start the app to see the signin/signup UI added for us via Amplify. Tap on Sing Up, complete the form and you should receive an email with your confirmation code. Once you provide your confirmation code, you will be redirected to signin page. Login with your username and password.
| Singup | Signin |
 |  |
Testing happy path
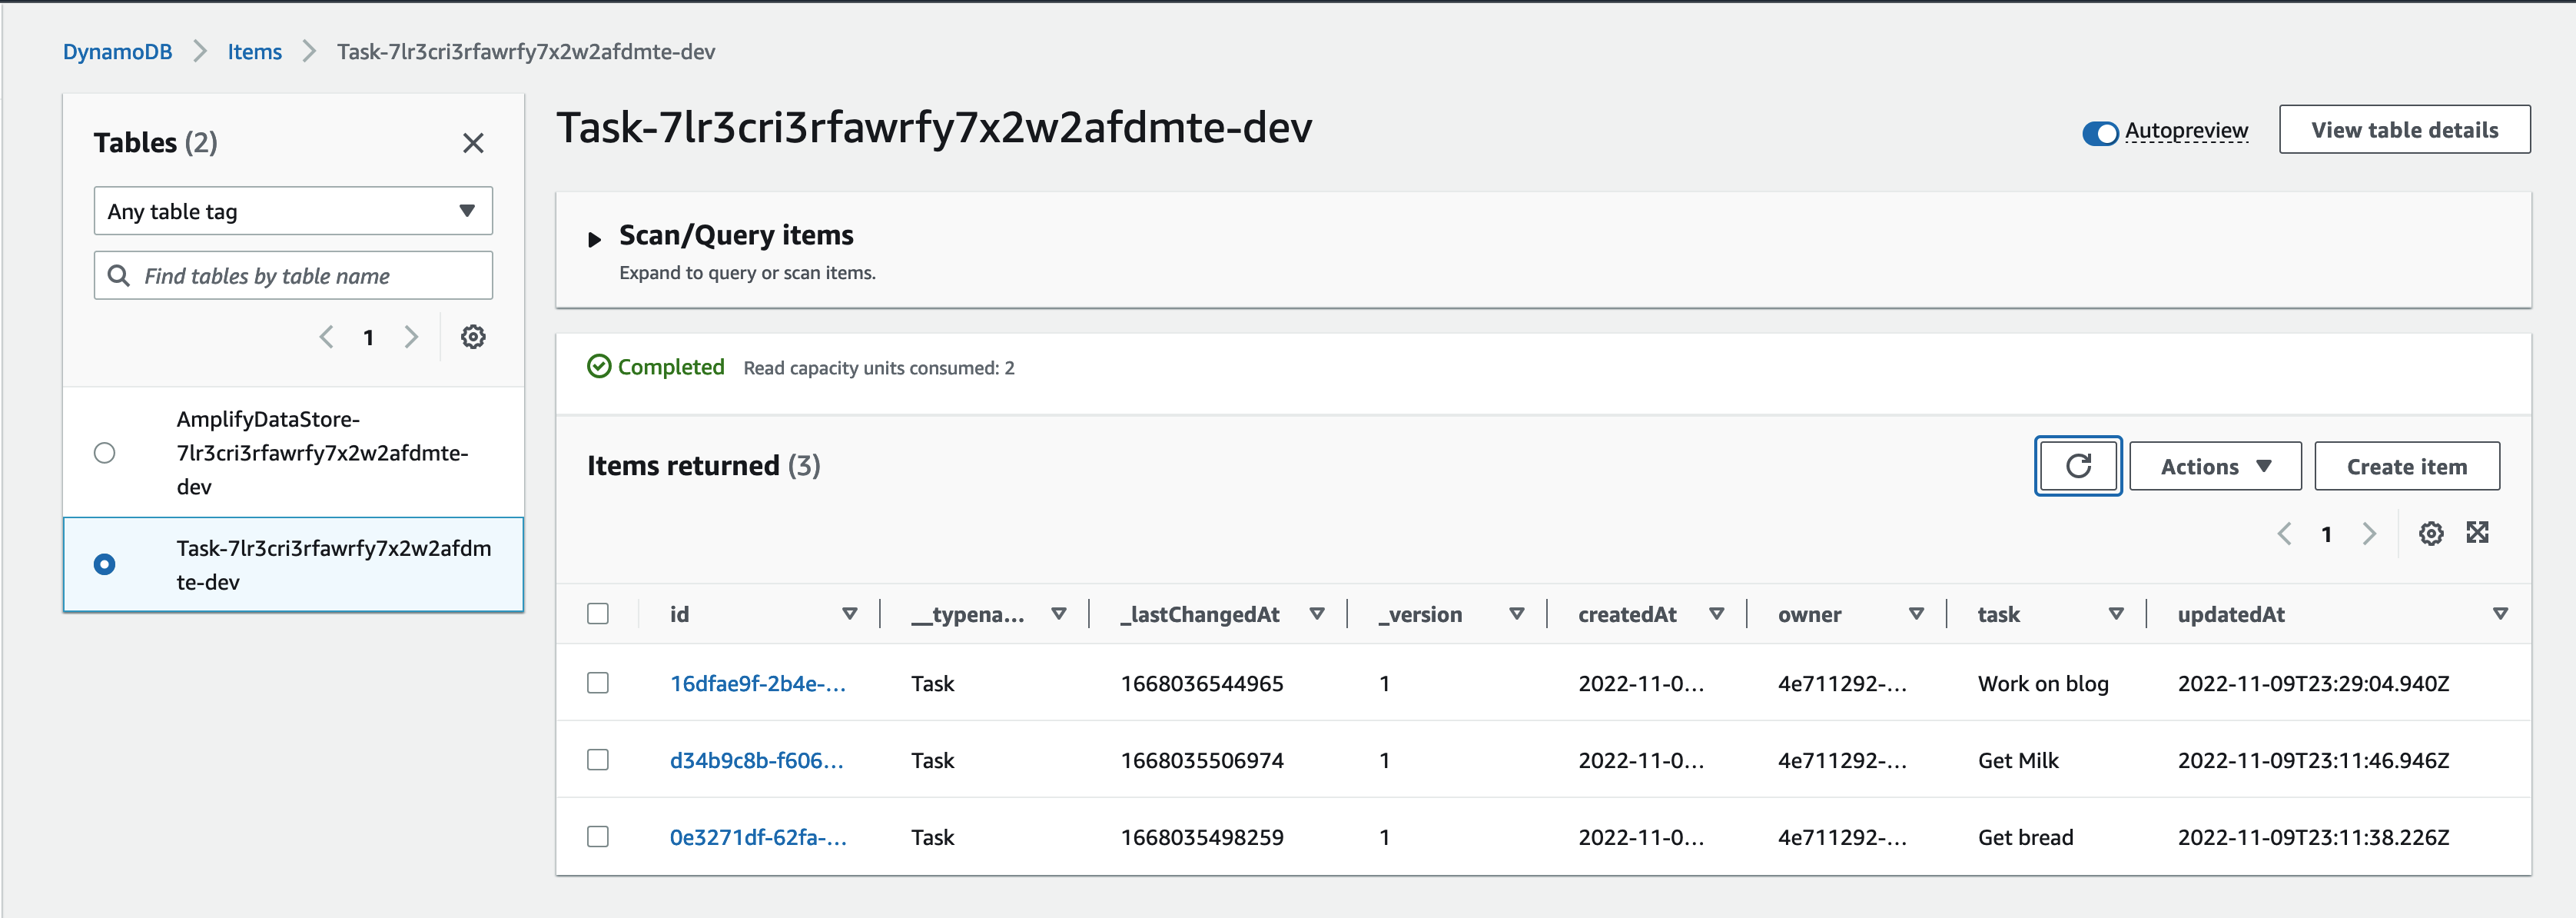
We're going to do some testing by adding a few test entries, and validate DataStore has sync'd the data on our DynamoDB table.
DynamoDB table before sync
adding a few todo entries
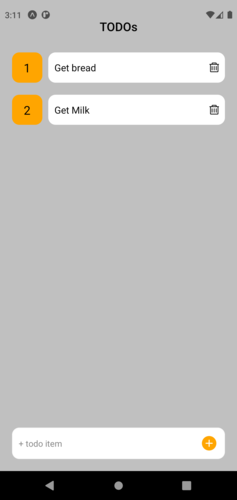
and validate the sync on DynamoDB side
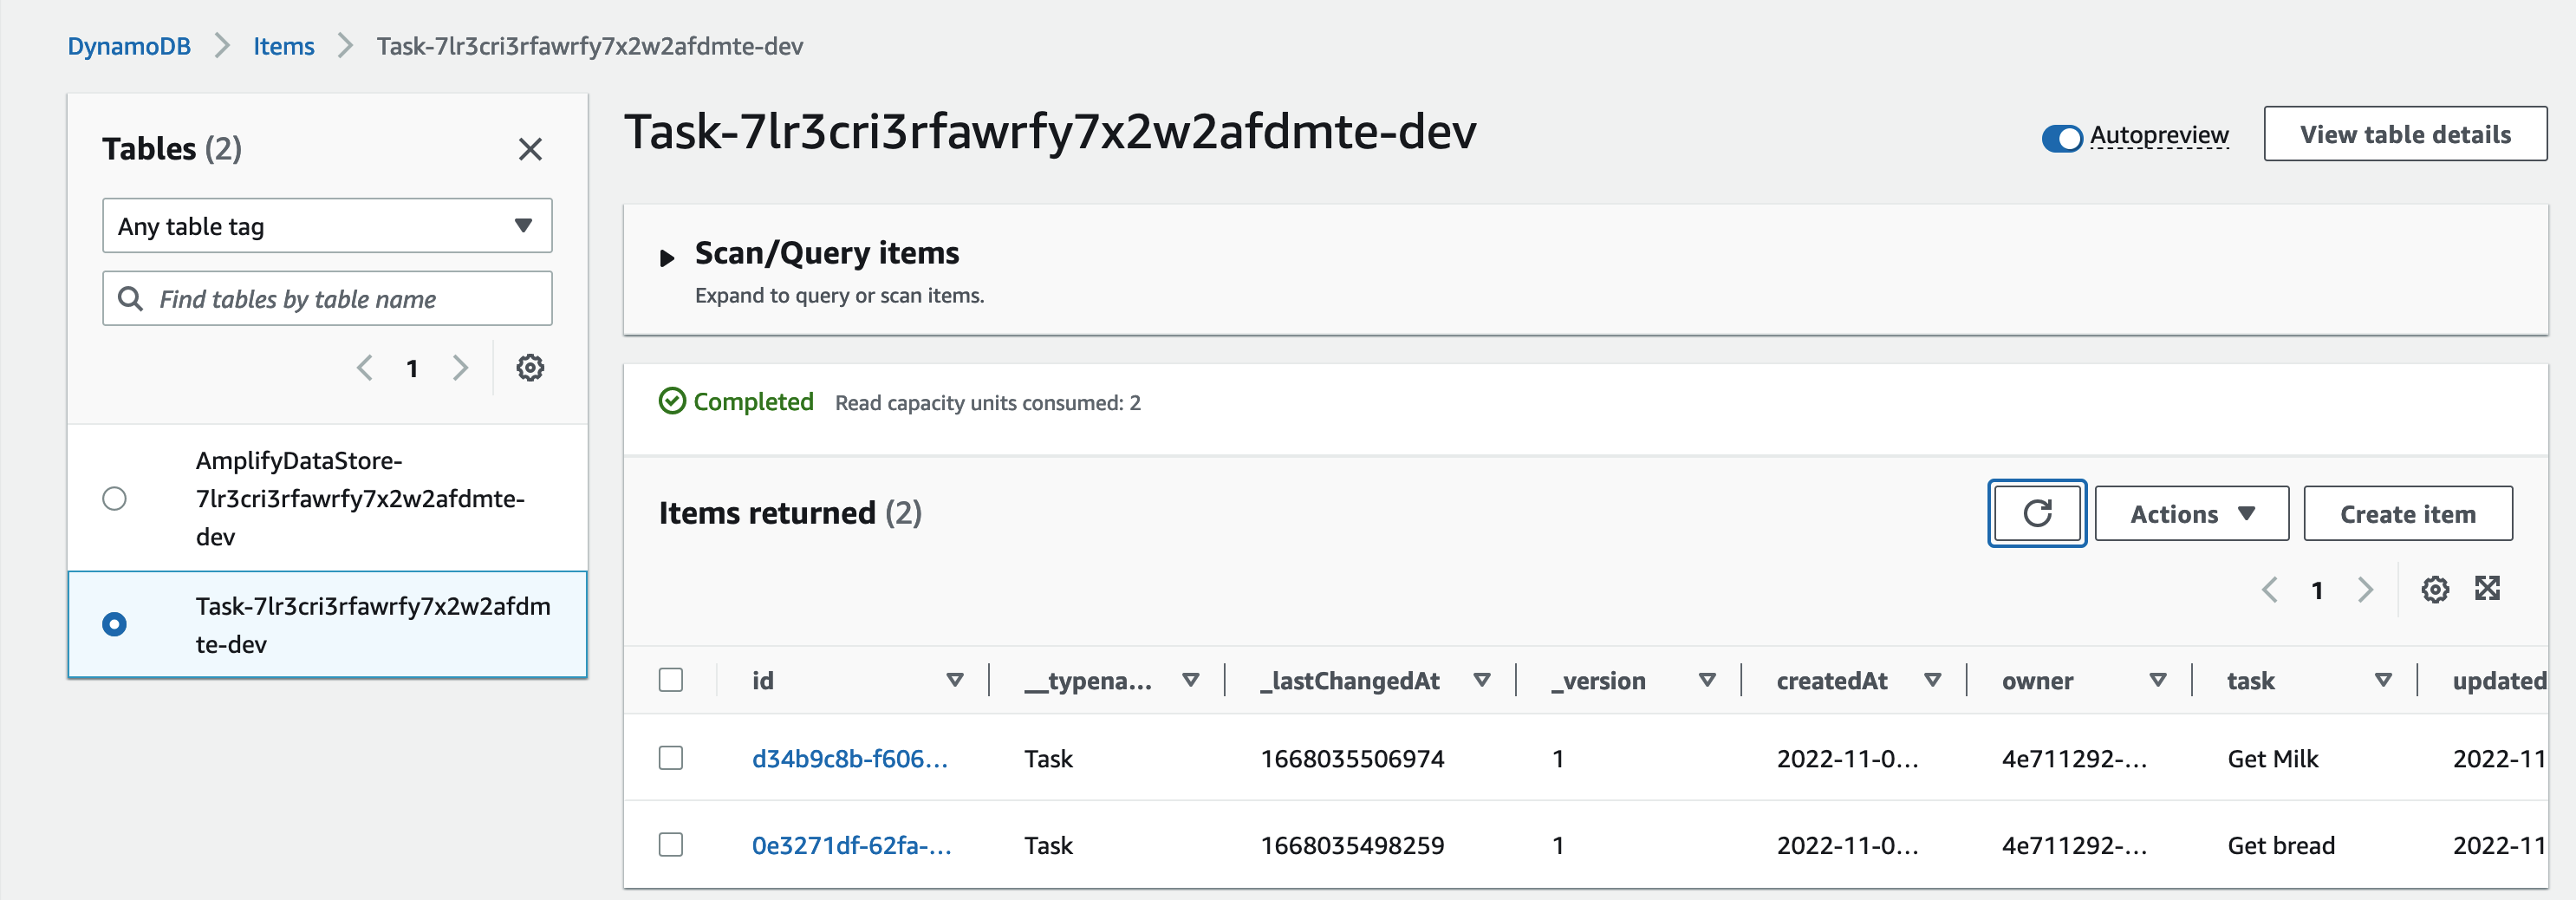
Both todo entries were sync'd via DataStore into DynamoDB table
Simulating Network Connectivity Issue
To simulate a network connectivity issue - I did this by just disconnecting my WiFi on my laptop - then adding a new Todo entry in the app
check DynamoDB to make the sure new entry was not sync'd on a different computer
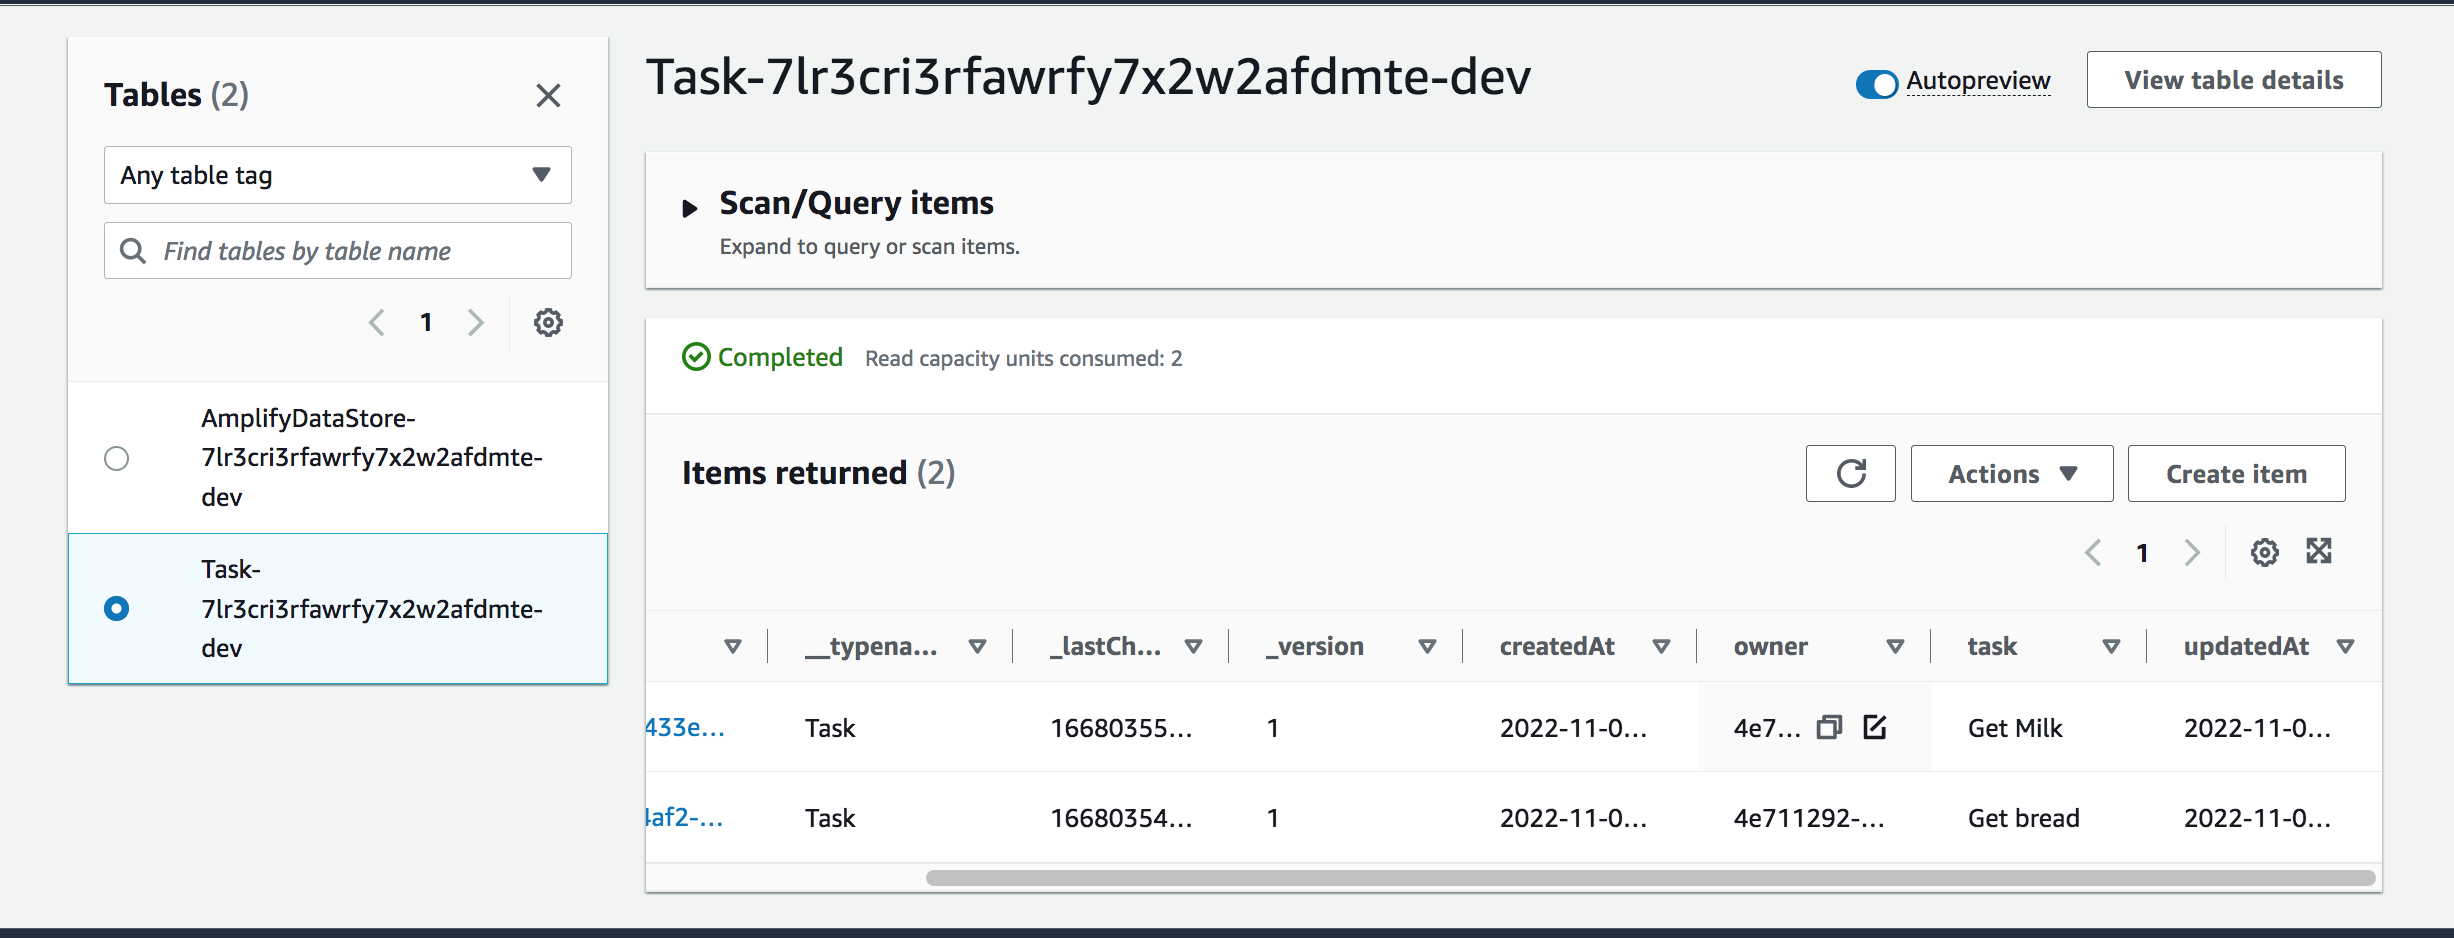
after establishing WiFi connection we see that our new todo has been sync'd
Testing a delete operation
We bought our bread, so go ahead and delete it from list the in the app

Check the table and you can see that Get bread has been marked under _deleted column as true

Adding a Sing Out button
Since we can sing in to the app let's also add a feature to sing out. Amplify
In App.js to our imported list of react-native components add Pressable, import Amplify's Auth and right below the opening <ScrollView> make the changes seen below and add <Pressable>
import { Keyboard, ScrollView, StyleSheet, Text, View, Pressable } from 'react-native';
import { Auth } from 'aws-amplify';
...
<ScrollView style={styles.scrollView}>
        <Pressable style={styles.button} onPress={signOut}>
          <Text style={styles.text}>Sing Out</Text>
        </Pressable>
then also include the function handling the Sing Out in App.js
async function signOut() {
    try {
      await Auth.signOut();
    } catch (error) {
      console.log('error signing out: ', error);
    }
  }
reload your app

What next
In regards to Amplify DataStore, we barely have scratched the surface. We did not cover all of the data operations available via DataStore
Review Manipulating Data from Amplify docs
Dive deeper into Relational Model and how GraphQL transforms are used in Amplify
Setting up Authorization Rules
Look into conflict resolution strategies offered.
Stop by and meet the AMplify team and other developers using Amplify by joining Amplify Discord